Create custom print presets
With BuildBee you can create your own custom print presets for when you can’t find what you’re looking for in the Add-On Marketplace.
Custom Print Presets let you define the print settings for preparing your model for printing. Creating a custom print preset is useful if the presets available in the Add-On Marketplace aren’t appropriate for what you're trying to achieve.

Those on a Starter Plan can purchase preset slots, or upgrade to a Pro subscription for unlimited preset slots.
Step 1 - Open My Presets
- Open the dropdown menu in the top right hand corner.
- Select 'My Presets'.
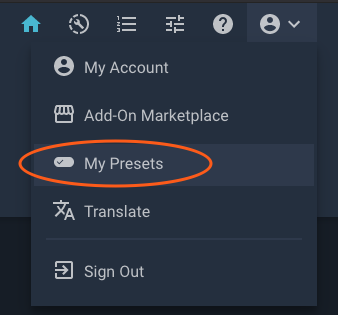
- Select the 'Print presets' tab.
Step 2 - Create your own Print preset
- From the 'Materials' tab, select 'CREATE' to begin the process.
- If you're on a Starter plan, you may may be prompted to upgrade to a Pro subscription or purchase an additional preset slot, if you have no slots remaining.
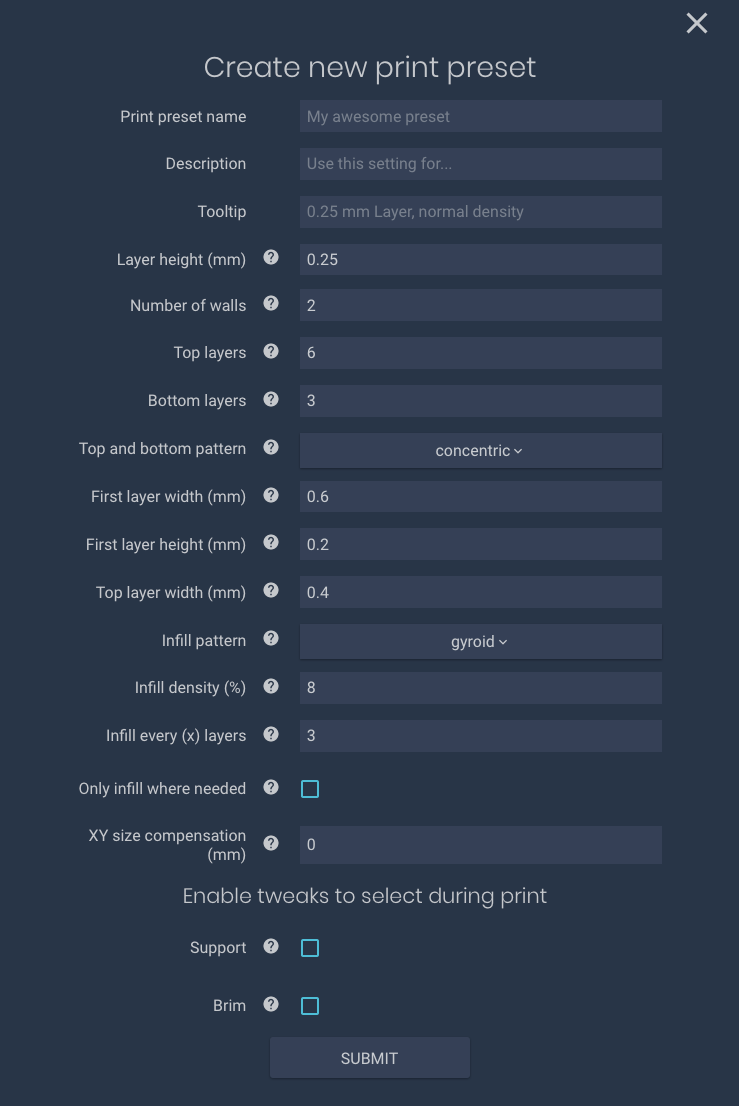
- You must enter the following information for each preset:

You can use the tooltips on each setting to get a better understanding of what each setting will change.
- Material name: The name of the material. This should be short and clear. Try to use the material brand and product name.
- Description: Use this field to describe the material properties that make it unique.
- Tooltip: Some helpful text that can convey specific information on the material settings which will appear as a 'help' icon (e.g. maybe it prints with extra thick walls).
- Layer height (mm): The hickness of each layer. Thin layers will produce high detail but will take longer to print and vice versa.
- Number of walls: The number of outer shells of your print. More walls will make your print strong but will take longer to print and vice versa.
- Top layers: The number of solid layers on the top surface of your print.
- Bottom layers: The number of solid layers on the bottom surface of your print.
- Top and bottom pattern: Changes how the top and bottom layers are filled in which will change how the surface looks.
- First layer width (mm): A specific extrusion width for the first layer. A higher value can help the print stick.
- First layer height (mm): A specific extrusion height for the first layer. A higher value can help the print stick.
- Top layer width (mm): Extrusion width for for the top layer.
- Infill pattern: Chooses the infill pattern, each of which have different print speeds and strength properties.
- Infill density (%): The amount of infill as a percentage. A higher percentage will be stronger but will take longer to print and vice versa.
- Infill every (x) layers: Speeds up your prints by setting the height of infill to be greater than that of outer walls (where having thinner layers provides detail).
- Only infill where needed: When selected, infill will only be used to support the top layers where it is needed rather than throughout the whole part.
- XY size compensation (mm): Scales the X and Y scaling of a model to help with fitting and tolerances. A positive value will scale outwards and negative will scale inwards.
- Enable tweaks to select during print: Enable things like supports and brims to be toggled as tweaks when choosing the print preset.
- Once you are happy with the settings, select 'SUBMIT' to finish. This will create the material preset and add it to your account.
The settings are prefilled with default values that should work if they aren’t changed.

Some combinations of settings will not result in a print preset that will print properly. Use at your own risk.
Step 3 - Use your custom materials
- Begin by returning to the homepage of the Buildbee app.
- Select a model.
- Select your printer or queue.
- Select your desired material.
- Select your custom print preset under the 'My Custom Materials' section.

Related Articles
Creating custom materials
With BuildBee you can create your own custom materials for when you can’t find what you’re looking for in the Add-On Marketplace. Custom Materials let you define the print settings for a material you want to print with. If you are using a common ...Print preset tweaks
The print preset tweaks in BuildBee allow you to make discrete adjustments to suit each model you print. Each print preset has a default setting for each of these tweaks and can be changed by selecting the preset and toggling each of the tweaks ...BuildBee Print Settings
Presets are pre-generated settings which are hand-crafted for a particular use. Each of BuildBee's default presets comes with tweaks which allow for modifications to the default behaviour, if desires. All Purpose This setting balances speed and ...Getting started with advanced Print Preset features
When you create a new Print Preset, or edit an existing one in the BuildBee Preset Manager you will notice a checkbox at the bottom for Advanced Settings. Checking this box will enable the advanced settings. Before you can use them, you will be shown ...Running a print
Once you have BuildBee set up and you have logged into your account, you will be able to run your first 3D print! Step 1 - Choose a model - Firstly, you need to choose what you would like to print. This may be something you have created yourself in a ...